Install & Upgrade DoseControl Software
SQL Server 2019 Express Edition Installation
For DoseControl Basic License Users: The basic setup requires MS SQL Server Express installed on the same PC workstation on which you will install DoseControl. Installing MS SQL Server Express takes only a few minutes. After you install MS SQL Express, you should install SSMS (SQL Server Management Studio), which will allow you to access your SQL Server on your PC.
SSMS (SQL Server Management Studio) Installation
For DoseControl Basic License Users: In this video, we show you how to install SSMS (SQL Server Management Studio). You should have MS SQL Server Express installed on your PC.
DoseControl Software Installation: First-time Installation
DoseControl software installation for Basic License: In this video, we show you how to install DoseControl software. Prior to this, you should have MS SQL Server Express and SSMS installed on your PC.
Launching DoseControl for the First Time: Connecting to the SQL Database
In this video, we show you how to connect DoseControl to your SQL database. After installing DoseControl software for the first time, when you launch the pplication you will be prompted to enter a connection string for your SQL Server.
Backup and Restore a SQL Databases in SSMS
In this video, we show you how to backup and restore a database in SSMS (SQL Server Management Studio). You should have MS SQL Server Express and SSMS installed on your PC. You should backup your DoseControl database on a regular basis. When you upgrade to a new version of DoseControl, you should always make a backup copy of your database prior to upgrading. If there is any issue you can simply restore your original database.
Upgrade to a New Version of DoseControl Software
This video shows how to upgrade from an older version to a new version of DoseControl software. Before you upgrade, be sure to backup your database (see above video), and make a note of your connection string under Setup > Connections and Storage.
Upgrade DoseControl Software to a New Version
Configure Software
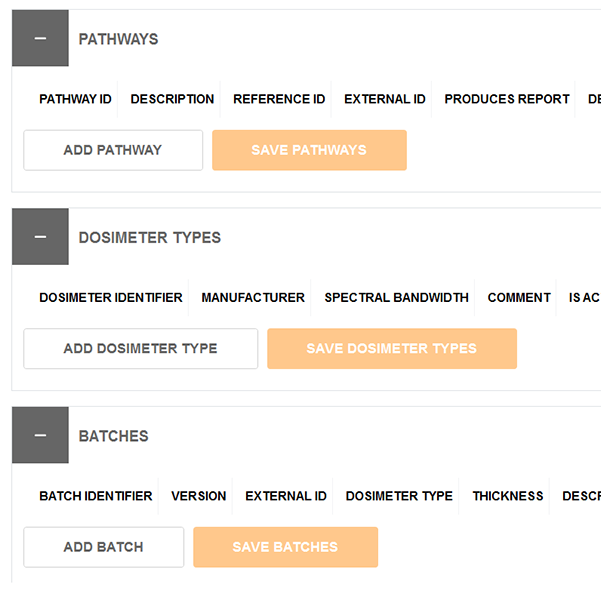
How to setup Pathways, Dosimeter Types and Batches
This video describes how to configure DoseControl dosimetry software. Before you can use DoseControl to measure dosimeters, you must first set up all your information. This video is Part 1 of a series about how to setup your dosimetry process information the software, and covers the following:
- Pathways (Irradiation pathways)
- Dosimeter Types (B3, FWT, Harwell Red/Amber Perspex, CTA)
- Batches (Dosimeter batches)
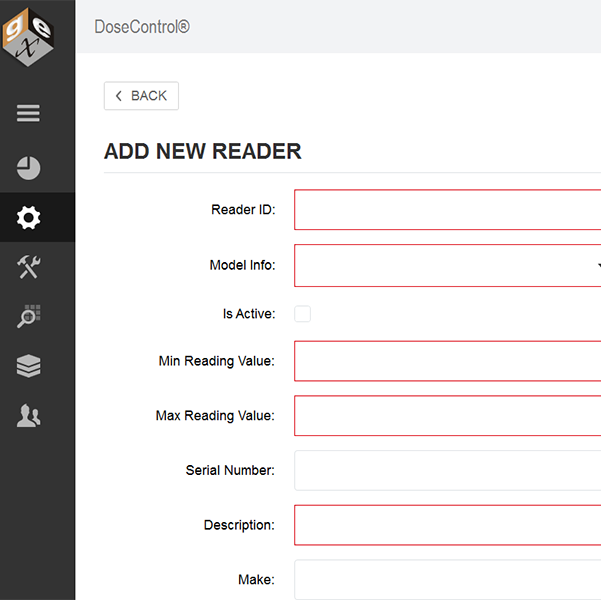
How to set up Readers (Spectrophotometers)
This video is part of a series about how to setup your dosimetry process in DoseControl software, and covers how to configure your each of your readers (spectrophotometers) in DoseControl.
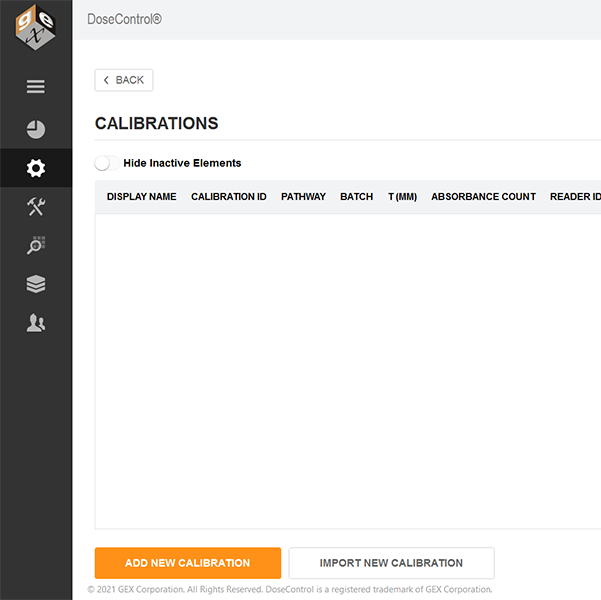
How to set up Dosimeter Batch Calibrations
This video is part of a series about how to setup your dosimetry process in DoseControl software, and covers how to configure the dosimeter batch calibrations in DoseControl. Calibration functions define the mathematical relationship between the dosimeter response and dose for each spectrophotometer in the DoseControl dosimetry system. Before you can set up calibrations, you must setup your pathways, dosimeter types, batches and readers.
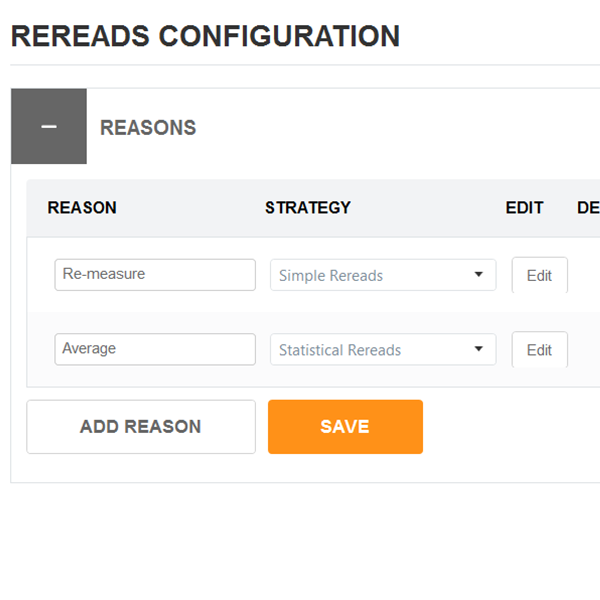
How to set up your re-reads (dosimeter re-measurements)
By default, DoseControl allows unlimited re-reads of a dosimeter, and each re-read absorbance measurement replaces the previous measurement in a dosimetry report. You can put restrictions, and define reasons for a user to perform a re-read by configuring the Rereads feature in DoseControl. This video shows how to configure Rereads.
Product Specification Module Setup
This video shows how to setup the Product Specification module (optional module). This module allows you to store dosimetry specifications (such as min/max required dose, Dref:Dmin, Dref: Dmax) for multiple products, so that a Technician does not have to manually enter the product information and specifications for a new dosimetry report.
How to Setup the Performance Verification (P.V.) Module
The Performance Verification (P.V.) module is an additional module for use with the Thermo Evolution spectrophotometer only, and is designed to use a standard from the Thermo Spectronic Standards kit (or other NIST-traceable standards set, certified in absorbance units, for the performance verification of the Thermo Evolution UV-Visible spectrophotometer). The purpose of the P.V. module is to provide a short-term verification or ‘daily check’ of the reader’s absorbance measurement accuracy. The P.V. module is intended to be used as an additional check to the user’s complete performance verification protocols for the reader. It is not a replacement for a complete performance verification of the reader.
Setup & Using Reports
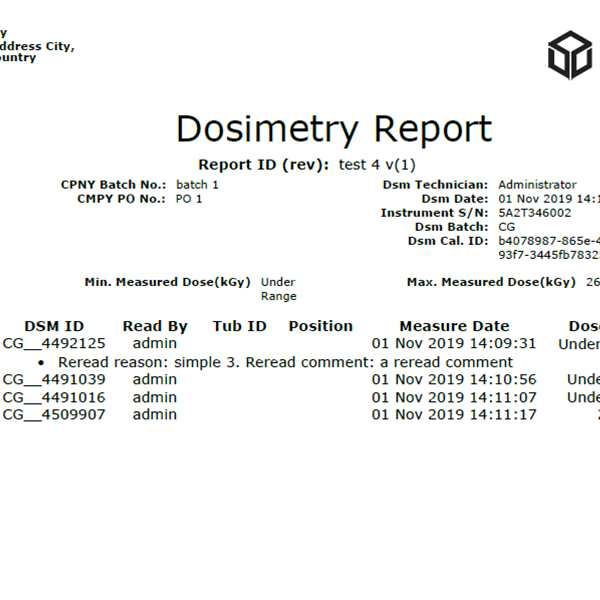
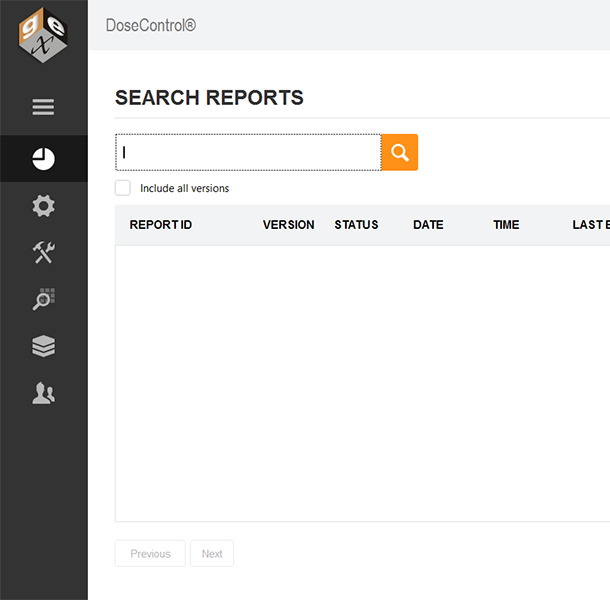
Overview - Dosimetry Reports in Dosecontrol
In this video, we show how dosimetry reports work:
- how to process a complete report,
- how to export or print a report to Excel and PDF,
- how to add a comment to a report
- how to make changes to the report information

How to Configure Report Types and Data Fields for Report Headers
This video provides a high-level overview about how to setup report types and data fields in the DoseControl software, using the Report Headers configuration. The layout and content of a dosimetry report is flexible and configurable, and the Admin can setup one or more report types to meet the needs of your process, such as a report of routine process dosimetry, E-beam testing, etc.
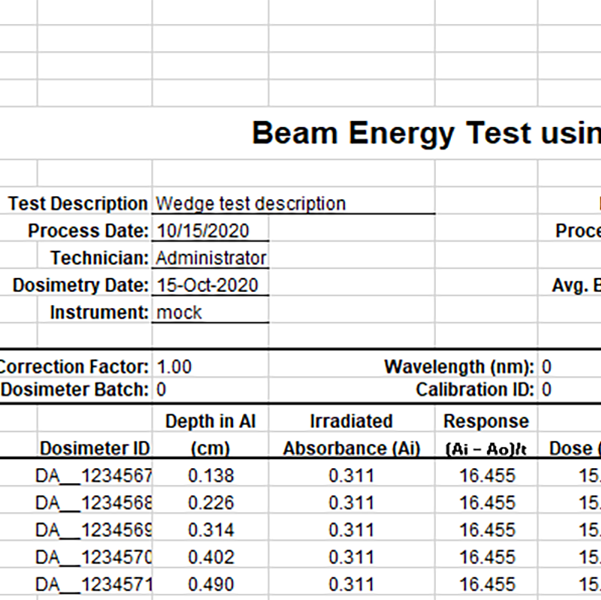
How to create a new Excel report & setup an E-beam energy test report
In this video, we demonstrate how to create an Excel dosimetry report in the DoseControl software. Next, we show how to setup the software so that you can create dosimetry report with specialized fields specifically for an E-beam energy test using a Risø wedge.

How to setup PDF reports in DoseControl
In this video, we explain how to configure different PDF report types. We demonstrate the setup and usage two different standard PDF templates - a generic "standard PDF template" for routine dosimetry, and a "reference dose PDF template" for routine dosimetry with reference position information. This video does not include a demonstration of a custom PDF, with special fields specific to your process.
How to Use DoseControl
Instructions for Dosimeter Measurements, Re-reads, and Skips
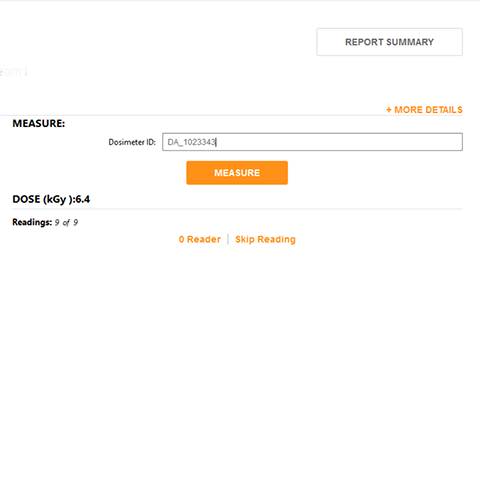
This video provides the basic instructions for how to measure a dosimeter using the DoseControl system. We show how to:
- Create a new report
- Open the measurement screen and zero the reader (spectrophotometer)
- Enter the dosimeter ID or scan the barcode of the dosimeter's ID
- Press the measure button to get the absorbance and dose
- Enter a position and tote ID for the dosimeter
- Re-read the dosimeter
- Skip a dosimeter measurement
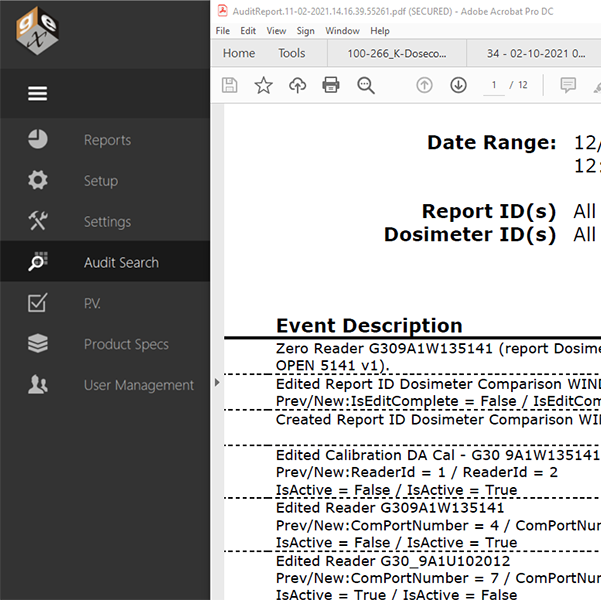
Using the Audit Trail Feature
This video shows how to use the audit trail feature to search, filter and view the historical record of events from the database. YOu can compile an audit report, and save and print a secure PDF audit trail report.
Using the Performance Verification (P.V.) Module
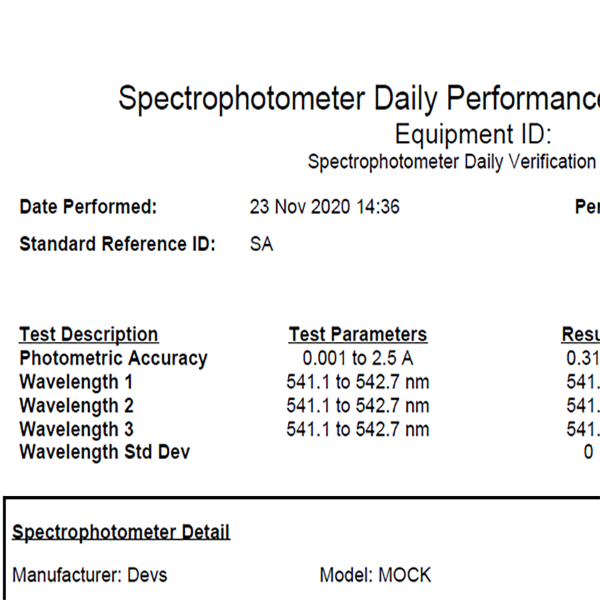
This video shows how to use the Performance Verification (P.V.) module in DoseControl to do a P.V. test for the Evolution spectrophotometer. This PV module is intended as a fast, convenient way to monitor the spectrophotometer's performance, and is part of the DoseControl software. Final PV reports are secure PDFs that can be saved or printed. The PV module is configured by the application admin to be used as a 'daily check' or other timeframe to test the spectrophotometer's photometric and wavelength accuracy. It uses a single photometric standard and takes 1-3 minutes to complete.
Using the P.V. Module - Passing a Test
We demonstrate how a user opens the P.V. module and executes a test. In this example, all the test passes within the parameters, and the final result of the test is "PASS". Next, the user can begin dosimeter measurements.
Using the P.V. Module - Failing a Test
We demonstrate how a user opens the P.V. module and executes a test. In this example, all the test passes within the parameters, and the final result of the test is "FAIL". If the P.V. test fails, the user cannot measure dosimeters with the Evolution until the test has been passed 2 additional times. If the reader continues to fail the P.V. test, further investigation is needed.
Hardware
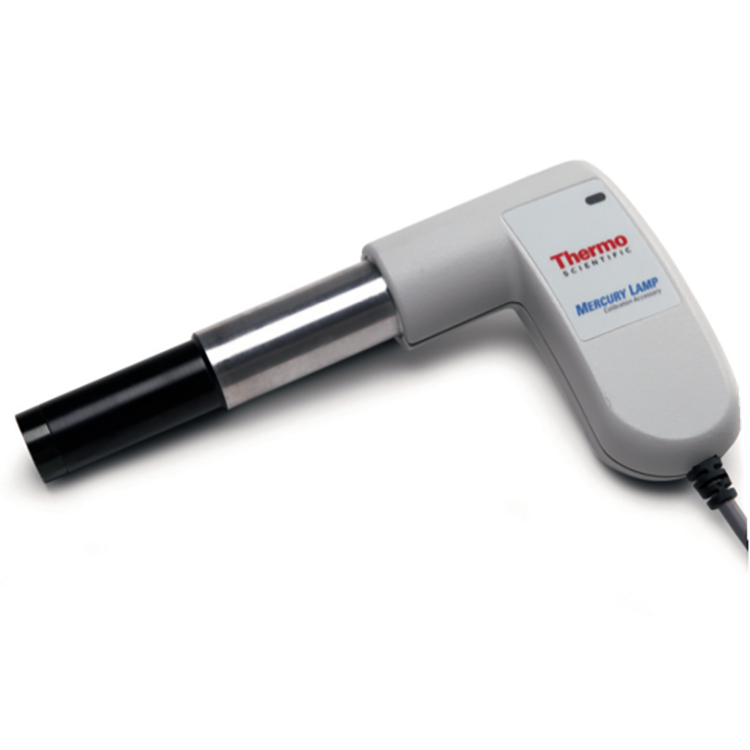
Using the Thermo Mercury Lamp for Performance Verification
This video provides a quick demonstration about how to use the Thermo Mercury Lamp to do a Performance Verification test for wavelength accuracy of the Evolution spectrophotometer.
Instructions for Installing the GENESYS 30 Baseplate
This video provides a close-up demonstration about how to install the GEX baseplate in a GENESYS 30 spectrophotometer.
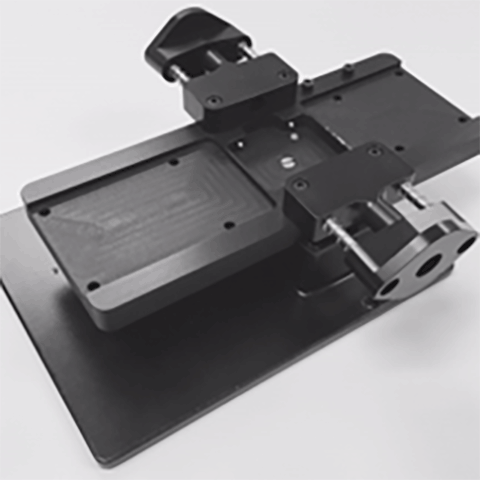
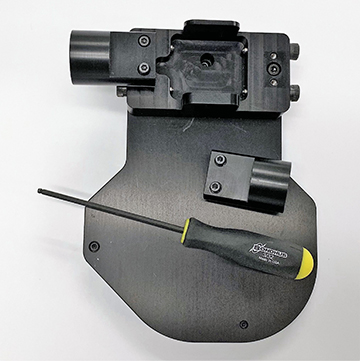
How to Install the Evolution Baseplate
This short video shows how to install the Evolution baseplate into the sample compartment of the Evolution spectrophotometer.
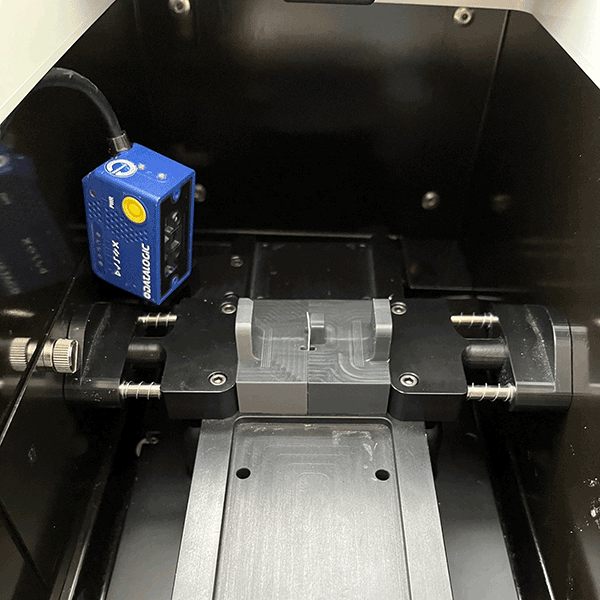
Install the Matrix scanner in the Evolution
The Matrix barcode scanner is part of the Evolution-DoseControl dosimetry system. The Matrix will scan dosimeter barcode ID automatically when the user measures a B3 dosimeter. This video shows how to install the Matrix scanner in the Evolution spectrophotometer and how to test scanner operation for successful barcode scanning.
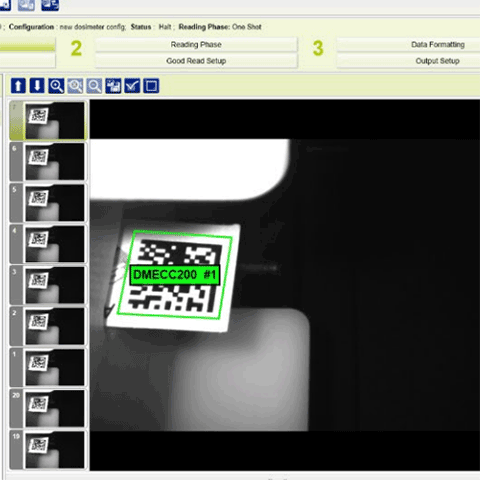
Verify Matrix barcode scanner performance and Connect to DoseControl
The Matrix barcode scanner is part of the Evolution-DoseControl dosimetry system. This video shows how to test the Matrix scanner Datalogic DL.CODE software to confirm it is scanning dosimeter barcode correctly. Next, we will show you how to make the Matrix scanner active in the DoseControl software.
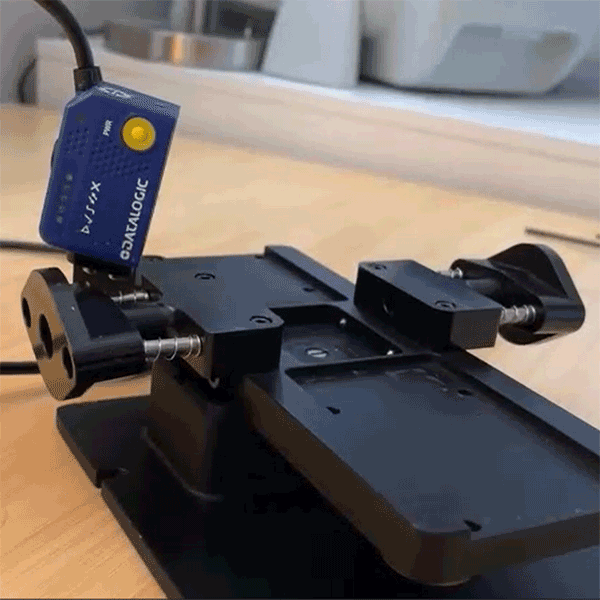
How to Attach the Matrix scanner to the Evolution Baseplate
This short video shows how to attach the Matrix barcode scanner to the Evolution baseplate. Use the scanner mount for the dosimeter type (B3 DoseStix or GEX B3).